Friday, 30 December 2011

Lemon sizzle drizzle cake with summer berries


Ingredients
225g softened butter
225g caster sugar
lemons , 3 zested and 2 Juiced
4 medium eggs , lightly whisked
200g self-raising flour
1 tsp baking powder
50g ground almonds

Topping
150g summer fruits
100g finest dark chocolate with chilli
25g butter
50g icing sugar

Method
  1. Wash and chop fruits, place in bowl with 1tbsp lemon juice and sprinkle of caster sugar, cover and leave to stand.
  2. Heat the oven to 180C/fan 160C/gas 4. Butter and line the base of a 20cm round cake tin. Beat the butter and caster sugar in a large bowl using an electric hand whisk until pale and creamy. Add the lemon zest (reserving some for decoration) and mix well. Whisk the eggs gradually into the butter mixture, beating well between each addition - don't worry if it curdles.
  3. Sift together the flour and baking powder and fold into the cake mixture using a large metal spoon or spatula. Add the ground almonds and 3/4 of the lemon juice and fold until thoroughly combined. Spoon into the prepared cake tin and bake for 1 hour 15 minutes or until a skewer inserted into the middle of the cake comes out without any raw mix on it.
  4. Put the cake tin on a wire rack to cool
Topping
  1. Melt chocolate and butter, spread over cake and leave to set.
  2. Place fruit on cake, retaining juice to use in icing.  Place icing sugar in bowl and add enough of the lemon fruity juuice to make a thin icing to drizzle over cake.
Based on: http://www.bbcgoodfood.com/recipes/3628/lemon-drizzle-cake

Wednesday, 28 December 2011

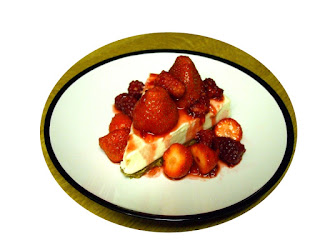
Summer berry cheesecake

Sping 2011 was sunny and wet in Scotland, this made for a bumper crop of soft fruits (main crop of this region).  My strawberries were huge and sweet, the golden raspberries out-performed the red and the Tay and Logan berries grew to epic proportions.  Here's one of the many ways I used them up:


    * 300g summer berries
    * 50g golden caster sugar
    * 100g digestive biscuits
    * 50g butter , melted
    * 1 tsp vanilla extract
    * 300g soft cheese
    * 50g icing sugar
    * 150ml pot double cream

1.  To prepare the berries, put the sugar and 3 tbsp water in a pan. Cook until dissolved then boil until syrupy. Add the fruit cook for a minute or two. You want them to soften but not burst. Tip into a sieve over a bowl and cool.

2. Butter the base and sides of a 22cm spring form cake tin then line with baking parchment. To make the base, whizz the biscuits in a processor to crumbs. Mix with the butter then tip them into the prepared tin and press firmly into the base to create an even layer. Chill in the fridge for 30 minutes. 

All the while singing along to this:


3. Mix the soft cheese, icing sugar and vanilla in a bowl until smooth then tip in the cream and mix until combined (it's better to use a wooden spoon for this as electric beaters will overwhip the cream). Stir through half the berries then spoon onto the base. Smooth the top of the cheesecake. Leave to set in the fridge overnight. 

4. Take the cheesecake from the fridge about 30 minutes before serving. Release the tin and remove the paper from the sides. Slide the cake onto a plate leaving the base paper behind. Spoon over the fruit and syrup before serving.

Tuesday, 27 December 2011

Nori rolls

My first attempt at sushi, some simple Smoked salmon and zested cream cheese and Sweet and Spicy steak and spring onion Nori rolls.


Here is a recipe for making sushi rice. Japanese rice is short grain rice and gets slightly sticky when it is cooked. Long grain rice isn't proper for sushi because it is drier and doesn't stick together.


Ingredients:

  • 3 cups Japanese rice
  • 3 1/4 cups water
  • 1/3 cup rice vinegar
  • 3 Tbsp sugar
  • 1 tsp salt


Preparation:

Put the rice in a large bowl and wash it with cold water. Repeat washing until the water becomes almost clear. Drain the rice in a colander.   DO NOT SKIP THIS STEP.

Place the rice in pan and add water. Let the rice soak in the water at least 30 minutes. Put on heat and bring to the boil. Simmer for 10 minutes and remove from heat, cover top of pan with clean dish towel (or kitchen roll) and let it steam until all moisture is gone (for about 15 minutes).

Prepare sushi vinegar (mirin) by mixing rice vinegar, sugar, and salt and microwaving on a gentle heat until the sugar dissolves. Cool the vinegar mixture.

Spread the hot steamed rice into a large plate or a large bowl.   Please use a non-metallic bowl to prevent any interaction with rice vinegar.

Sprinkle the mirin over the rice and fold the rice quickly using a plastic or wooden spatula, being careful not to smash the rice.

To cool and remove the moisture of the rice well, use a fan as you mix sushi rice. (I opened my window, it's windy this time of year!) This will give sushi rice a shiny look. It's best to use sushi rice right away.

Based on: http://japanesefood.about.com/od/sushiforbeginner/r/sushirice.htm

Now that makes loads, enough for 6 Nori sheets - so I only made up 1 cup of it.

Fillings

Smoked salmon and zested cream cheese:

Save back some nice strips to place directly on sheets, chop the rest through the cream cheese and add zest and a dash of lemon juice.

Sweet and spicy steak and spring onion:

Fry up some good quality steak and cool before slicing.  Add sliced spring onion and sweet pepper, stir through sweet chilli sauce.

Preparation

1. Lay nori sheet on clingfilm, shiny side down.

2. Spread the rice thinly onto nori sheet, leaving a 1 cm gap at either end.  Spread filling in thin line and place on strips of meat/fish/veg before rolling up. 

(Rolling is made easier with a rolling mat: bamboo place mats make a good cheap readily available alternative.)

3. Slice by dipping sharp knife in cold water (so it doesn't stick and holds shape).

Serve immediately with pickled ginger, soy dipping sauce.  You can garnish further with strips of: sweet peppers, cucmber, spring onions, etc.

Notes: You can leave it overnight before slicing if you need to prepare the night before. 

You can use any fillings you like, we didn't think the beef ones worked that well, they weren't moist enough to hold their shape well and didn't taste quite right either, flavours just didn't go well.   The salmon ones were lovely, as were the Chicken and pineapple and the Tuna mayo.  The best we've had so far though, were cooked salmon fillet with zested mayo.

You can also roll them up so the rice is on the outside and cover with toasted sesame seeds to add variety.  Here's a few links for ideas on filings and rolling patterns:

http://www.ifood.tv/recipe/vegetarian_sushi
http://allrecipes.com/recipe/smoked-salmon-sushi-roll/

Search google images for Sushi roll for further inspiration!

Saturday, 24 December 2011

Chocolate cake with toffee icing

My first go at piping with whipped cream - it's a disaster!!

Moist Chocolate Cake


  • 150g plain flour


  • 200g caster sugar


  • 5 1/2 tablespoons unsweetened cocoa powder


  • 1 1/2 teaspoons bicarbonate of soda


  • 1 egg


  • 1/2 teaspoon salt


  • 125ml milk


  • 1/2 teaspoon lemon juice


  • 4 tablespoons olive oil


  • 4 tablespoons groundnut oil (I substitute 4 tbsp melted butter)


  • 1 teaspoon vanilla extract


  • 125ml boiling water


  • Prep: 20 mins | Cook: 1 hour

    1. Preheat the oven to 150 C / Gas 2. Lightly grease a 20x20cm or similar sized dish.
     
    2. In a bowl, mix together the dry ingredients - flour, sugar, cocoa and bicarbonate of soda.
     
    3. In another bowl, mix together the wet ingredients - egg, salt, milk, lemon juice, oils and vanilla extract. Then add the boiling water and stir to incorporate.

    4. Mix the wet and dry together, folding in until just combined. Try not to over-mix.
     
    5. Quickly pour the batter into the prepared dish and bung into the oven for 1 hour. Check for doneness by inserting a skewer, if it comes out clean, it's ready. Allow to cool.


    Toffee Icing 2 tablespoons butter
    2 tablespoons brown sugar
    2 tablespoons milk
    1 cup icing sugar, sifted

    Gently heat butter and sugar in saucepan until sugar is dissolved.
    Add milk, bring to boil, remove from heat.
    Gradually pour butter mixture into sifted icing sugar, sirring continuously.
    Pour over cooled cake immediately.

    Friday, 23 December 2011

    Edible santa and sleigh


    Santa and reindeer made with chocolate and marzipan

    300g Marzipan
    Red, Green and Black food colouring
    70g Milk chocolate buttons
    100g Galaxy Milk chocolate
    250g White roll out icing
    Red glimmer sugar
    2 Strawberry laces
    25g White chocolate
    Chocolate Santa
    Wrapped chocolate sweets for presents
    1 Glace cherry for Rudolph's nose

    Equipment:
    Red and Gold shiny paper
    Tape
    Scissors
    Lots of cardboard
    Couple of cans, different sizes for the sleigh base mould (I used potatoes and soup)
    Greaseproof paper
    Kids paintbrushes, small

    To make the sleigh:

    1. Create a sleigh shape mould by taping the cans together, use a strip of cardboard to bridge the gaps.  Stand this on it's end (so the cans are upright) and trace 2 sleigh side shapes onto greaseproof paper.  You can get creative with the top edge, I just kept it simple and put in a couple of 'door' shapes.

    2. Cut a strip of greaseproof paper to the width you want your sleigh and lay the buttons on it in an overlapping lattice pattern.  Place this somewhere warm to melt together into one strip.  I put it on the radiator - be careful it doesn't melt the whole thing though, you want to keep the shape of the button pattern for presentation.  You need it melted enough that it just sticks together, once it's at this stage drape over the can mould and gently tape another strip of greaseproof paper over the top to hold the curved shape.  Leave to harden.

    3.  While it's drying start on the slegh sides.  Get the shapes you traced earlier and make a thin sausage of black marzipan to put around the edges.  Make sure it's all joined up before filling with melted chocolate.  Leave to harden.

    4. Once everything's set you're ready to assemble!  Carefully remove the curved sleigh base from the cans and sit on it's side.  Remove one of your sleigh sides and place in the base.  Brush melted chocolate along the join and leave to harden, once set repeat with the other side and leave the whole thing overnight somewhere cool.

    5.  To decorate, brush an thin layer of melted chocolate where you want the glimmer suger to go and sprinkle it on.

    To make the reindeer:

    1.  Colour the bulk of the marizpan with the red and green colouring to make brown, you'll need a lot more green than red and add gradually to get the shade you want.  Then colour some black for eyes, noses and hooves and leave some yellow/uncoloured for the antlers.

    2.  Split the brown into 8 equal pieces and one larger piece for Rudoplh.   I'll give instructions to make Rudolph, the rest are the same except slightly smaller and use black marzipan for noses rather than a glace cherry.

    3.  Split the Rudolph piece into 3 roughly equal balls.  Use the largest for the body, the smallest for the head and split the third into 4 more parts to make legs. 

    4. Leave the head piece as a ball, press two holes in the top for the antlers to go in.  Stick the cherry and eyes on with melted chocolate (the paintbrush can aid neatness!).  Leave to dry

    5. Roll the body into fat sausage shape.

    6. Roll the legs into four thin sausages and press on balls of black for hooves.  Gently stick the legs together into a block, then stick to the body - you may need to use more melted chocolate. 

    7. Stick on the head and ou're ready to start on the antlers.

    8. Roll out the yellow marzipan into thin sausages, cut three strips for each antler and press the ends together, they kind of look like bird feet.  Lightly brush on white chocolate for structural support and leave to harden (overnight preferably).

    9.  Once the antlers are dry, dip the ends in more white chocolate and place in the antler holes on Rudolph's head.

    Presentation:

    1. Cut out piece of cardboard for base (use the can mould to help get the right size) and cover with red paper, I also made a little bridge shape, so the reindeer are presented better.

    2.  Cut out a bigger piece of cardboard and cover it with gold paper (I had to this as my cardboad was too thin to take the weight and I needed to double it up, thicker cardboard and you'd get away with one layer, though I'm pleased with how it looks so hey ho prolly for the best!)

    3. Rollout a strip of white icing for snow and place on sleigh and reindeer using white chocolate to stick them in place.  Apply fiddly red laces to make reins, fill the sleigh with chocs and stick on santa!

    Thursday, 22 December 2011

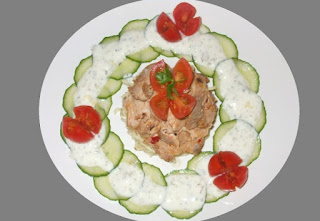
    Sweet chilli chicken and lime noodle salad with minted cucumber


    Leftover roast chicken
    Packet of dried noodles (cheap is fine, discard the 'flavouring'!)
    Sweet chilli sauce
    Lime juice
    Olive oil
    Mint jelly
    Yoghurt
    Sesame seeds (toasted) (opt)
    Cucumber (sliced)
    Cherry Toms (almost quartered to make a flower shape)


    1. Cook noodles and drain, coat with olive oil and leave to cool.

    2.  Slice leftover roast chicken thinly and coat with a sweet chilli dressing, I cheated and bought Asda's sweet chilli sauce (which is currently our favourite on the market - just the right amount of heat)

    3. Mix some mint jelly with plain yoghurt and leave to stand.

    4.  Pour a generous amount of lime juice onto the cooled noodles, a glug of olive oil and add sesame seeds if using - combine.

    Presentation:

    If you have a cooking ring, place in centre of plate and pack with noodles.  If you don't, a washed out cottage cheese pot with the bottom cut off will give you same results.  Pull the ring half-way up the noodle bed and then pile on chicken.

    Arrange cucumber around the edge and pour on yoghurt.  Finish with tomatos and sprig of parsley/coriander (opt)